
Geopt Proud Member

Mensagens: 10775
Registado: domingo 25 abr 2010, 09:08
Localização: Portugal
 Post: #1 a terça 03 fev 2015, 10:55
Photographing your coins
A short while back someone had asked how to photograph coins and the various techniques were both enlightening and sometimes frustrating for the amateur photographer. I had tried for a while to hunt down the old method that I showed people how to use, but have recently moved up to an even simpler method that I had the pleasure to demonstrate at geocoinfest. (Snoogans, I haven't forgotten, I'll get the pictures for you!) People have been very generous in their appreciation for the photos I've taken, but I feel a bit guilty about how silly simple it is to take a great picture so it's time to share with you the method.
Now, admittedly a 3d coin shows up better with all it's beautiful shading and if it's an antique finish it's even easier. However, when we get into shiny finishes (particularly silver) it's gets really tough really quick. Typically you end up with an almost black reflection as the coin pics up the reflection of the camera shooting the photo and it's very frustrating. With a quick bit of work we'll get you set up to take great pictures cheap, easy quick!
First thing you'll need is equipment. Don't be scared, it consists of a cheap point-and-shoot camera or even better a cellphone. Yes, I know that sounds counter intuitive, but what we're looking for is a small lens diameter. I use a 8 year old olympus point and shoot, a samsung rugby phone or my brand new Canon T3i, but it's easiest to use the one of the first two. Other than your picture taking instrument (even a tablet with camera works!), you'll need a piece of white paper about 1 inch by 1 inch (I just use the back of the little printed card in the coin flip usually) and a 2quart milk jug that's heading into the recycle bin.
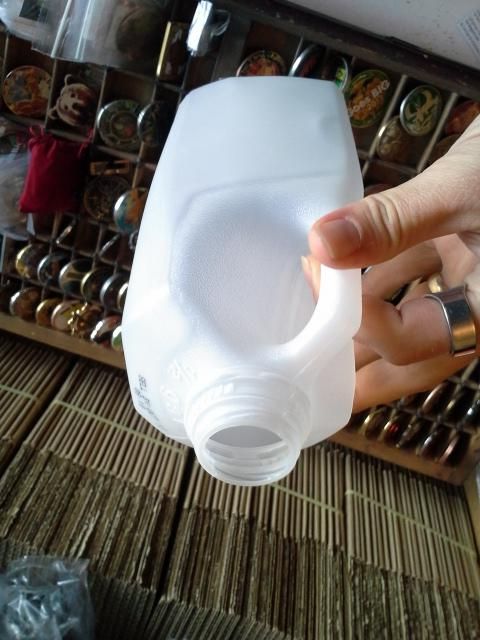
Take that jug and clean it good (no one wants to smell sour milk while shooting coins pics!) and chop off the bottom with a steak knife or razor blade.
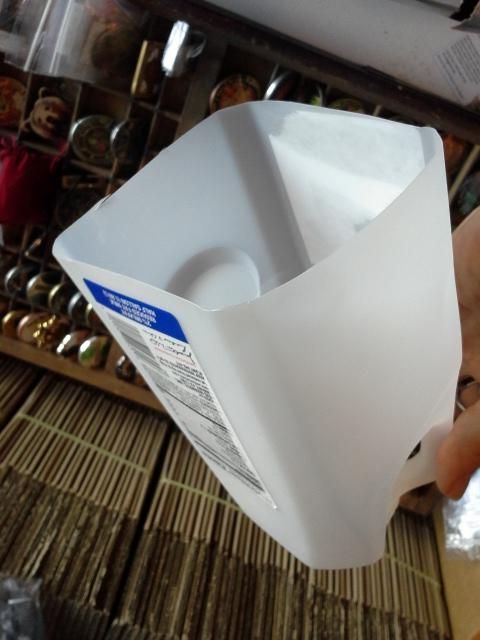
Use a pair of scissors to smooth up your hacking off the bottom and try to get as uniformly trim as you can so when you sit it on the counter with the top up it's sits pretty square and even. Go near an outside window or even better go outside and try to aim for about 1-3pm for best results. Light changes color during the day and just after lunch to early afternoon is your best light time.
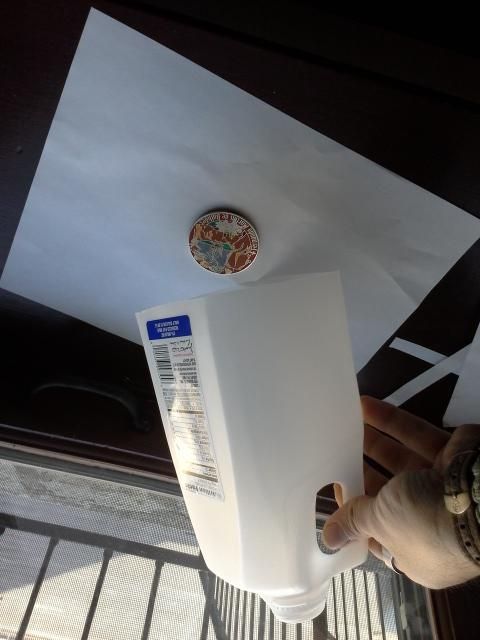
Notice it's not very light, bright or even moderately even lighting on my window sill at the office. Don't worry, your magic redneck-lightbox-jug will fix that for you! Set the jug over your coin and focus your camera through the neck of the jug to zoom in and take your photo. I'm shooting on a piece of white paper here which works really great, but if you're shooting on a colored surface, put your little white paper chip about an inch to 2 inches away from the coin. This will give your camera a reference for white balance and keep your colors looking their best.
Tips for better shots:
1) If your camera has a macro setting (that little flower picture in the options) then use that.
2) If you're having a hard time getting your camera to focus, try focusing on the edge of the little paper chip. A sharp defined edge helps your autofocus get better results.
3) If you're seeing a dark spot reflecting on the coin, try tilting the jug just a little bit and you'll see the dark spot move off of the coin.
4) To keep your camera steady, lean it right on the top of the jug to stop the shaking.
5) If your camera has a lens that moves in and out (and it's larger than the jug opening), just hold it very lightly against the jug top as it's focusing to avoid damaging the lens motor.
With about 5 minutes or less practice you should be able to get results likes these...
I hope this simple trick helps you take and post great pics of your beautiful collection! - Hound
Source: Groundspeak Forums > Trackables > Geocoins
Now, admittedly a 3d coin shows up better with all it's beautiful shading and if it's an antique finish it's even easier. However, when we get into shiny finishes (particularly silver) it's gets really tough really quick. Typically you end up with an almost black reflection as the coin pics up the reflection of the camera shooting the photo and it's very frustrating. With a quick bit of work we'll get you set up to take great pictures cheap, easy quick!
First thing you'll need is equipment. Don't be scared, it consists of a cheap point-and-shoot camera or even better a cellphone. Yes, I know that sounds counter intuitive, but what we're looking for is a small lens diameter. I use a 8 year old olympus point and shoot, a samsung rugby phone or my brand new Canon T3i, but it's easiest to use the one of the first two. Other than your picture taking instrument (even a tablet with camera works!), you'll need a piece of white paper about 1 inch by 1 inch (I just use the back of the little printed card in the coin flip usually) and a 2quart milk jug that's heading into the recycle bin.
Take that jug and clean it good (no one wants to smell sour milk while shooting coins pics!) and chop off the bottom with a steak knife or razor blade.
Use a pair of scissors to smooth up your hacking off the bottom and try to get as uniformly trim as you can so when you sit it on the counter with the top up it's sits pretty square and even. Go near an outside window or even better go outside and try to aim for about 1-3pm for best results. Light changes color during the day and just after lunch to early afternoon is your best light time.
Notice it's not very light, bright or even moderately even lighting on my window sill at the office. Don't worry, your magic redneck-lightbox-jug will fix that for you! Set the jug over your coin and focus your camera through the neck of the jug to zoom in and take your photo. I'm shooting on a piece of white paper here which works really great, but if you're shooting on a colored surface, put your little white paper chip about an inch to 2 inches away from the coin. This will give your camera a reference for white balance and keep your colors looking their best.
Tips for better shots:
1) If your camera has a macro setting (that little flower picture in the options) then use that.
2) If you're having a hard time getting your camera to focus, try focusing on the edge of the little paper chip. A sharp defined edge helps your autofocus get better results.
3) If you're seeing a dark spot reflecting on the coin, try tilting the jug just a little bit and you'll see the dark spot move off of the coin.
4) To keep your camera steady, lean it right on the top of the jug to stop the shaking.
5) If your camera has a lens that moves in and out (and it's larger than the jug opening), just hold it very lightly against the jug top as it's focusing to avoid damaging the lens motor.
With about 5 minutes or less practice you should be able to get results likes these...
I hope this simple trick helps you take and post great pics of your beautiful collection! - Hound
Source: Groundspeak Forums > Trackables > Geocoins
It's not always the find that brings the smiley... 
It's not about the number you've found.
It's about the fun you had along the way.
The only numbers that matter are the friends you make!
It's all about the journey, the challenge, and enjoying the outdoors!
It's not about the number you've found.
It's about the fun you had along the way.
The only numbers that matter are the friends you make!
It's all about the journey, the challenge, and enjoying the outdoors!


![[^]](./images/smilies/icon_smile_approve.gif "Aproved")
