[MANUAL] Geopt.org Geocaching Tools
 Enviado: quinta 06 out 2011, 00:29
[PT]
Geopt.org Geocaching Tools
O portal GeoPT criou uma ferramenta com um interface simples e amigável que permite, em poucos minutos, e fectuar várias operações automatizadas sobre o site geocaching.com, especificamente na área do utilizador, tais como carregamento de imagens para os registos e registos automáticos de movimento de trackables.
Instalação
A instalação é simples e apenas requer algumas indicações por parte do utilizador. Pode ser instalada para um utilizador do computador ou para todos.
A aplicação tem como requisito o produto Microsoft .NET Framework 4.0, mas se o mesmo não se encontrar instalado no computador, a aplicação informa e indica o endereço para o descarregar.
Primeira utilização - Autenticação e Autorização
Na primeira utilização é necessário efectuar a autenticação junto do geocaching.com,carregando em “Authenticate And Authorize”.
No entanto, mesmo sem autenticação, é possível utilizar os acessos às ferramentas online do portal Geopt.org, “Online Tools”.
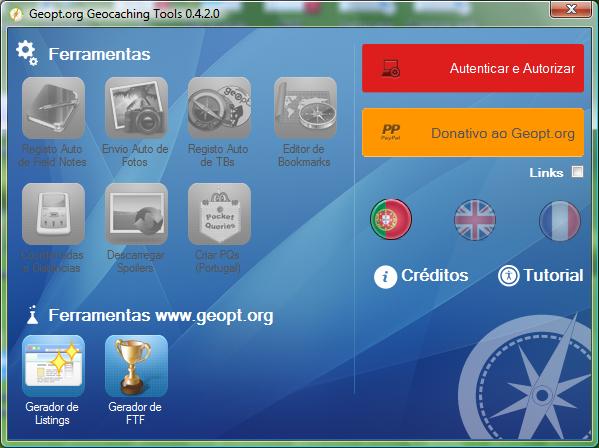
A autenticação e autorização são efectuadas seguindo os três passos apresentados no écran “Authentication”:
1. Carregar em “Get Authorization”

2. Introduzir os dados de utilizador no geocaching.com, nome utilizador e palavra-passe
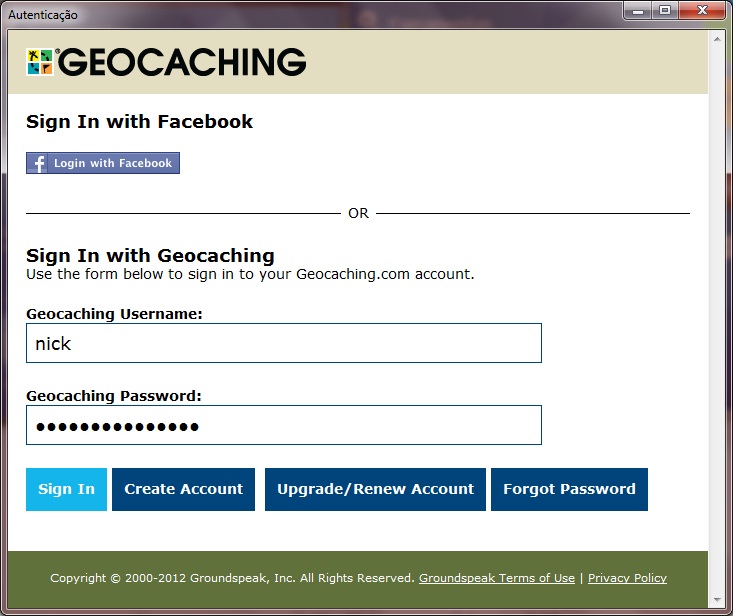
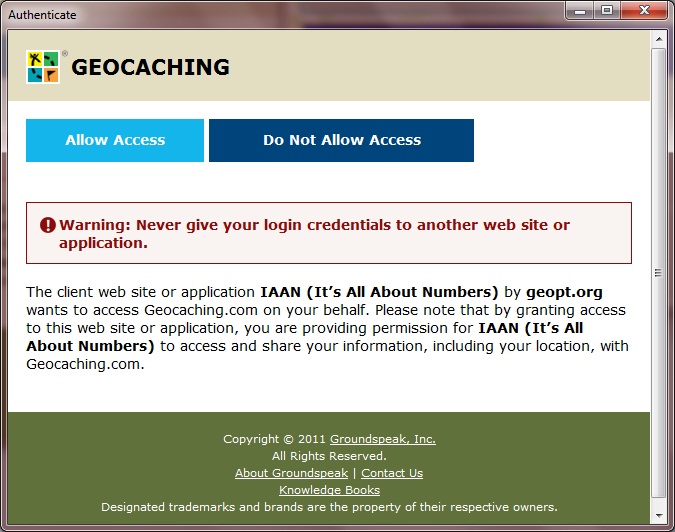
3. Carregar em “Allow Access”
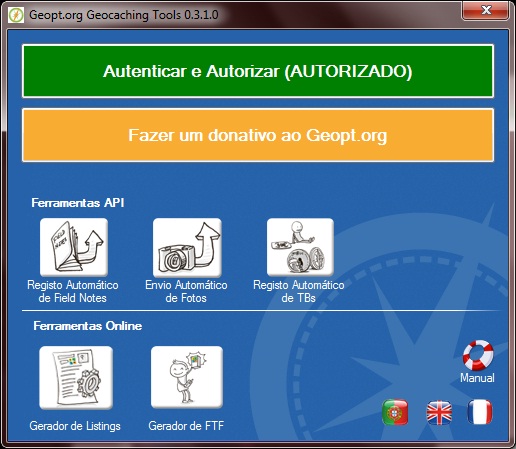
Após este processo a aplicação disponibilizará as ferramentas e em futuras utilizações não será necessário voltar a autenticar e autorizar, ficando a aplicação com o seguinte aspecto:
Utilização das ferramentas
Online Tools
As ferramentas online do portal Geopt.org são acedidas através dos botões disponíveis e a utilização de cada ferramenta está explicada nas respectivas páginas do portal.
Neste momento estão disponíveis as ferramentas "Listing Generator" e "FTF Generator".
Tools
Photo Upload
O écran principal da ferramenta de carregamento de fotografias é composto por várias linhas, correspondentes aos últimos Logs do utilizador, que são carregados quando o écran é iniciado, ou quando se escolhe o botão “Refresh Logs List”. De momento a ferramenta disponibiliza os últimos 100 Logs.

Carregamento de Imagens

Para cada Log onde se pretenda acrescentar imagens:
1. Carregar no botão “Add Images” e na caixa de selecção de imagens que aparecerá escolher uma ou várias fotografias de uma pasta localizada no computador.
2. Escrever o titulo para as imagens no campo “Caption Prefix”, pois as fotos a carregar em cada Log terão como título o texto definido neste campo seguido de um número sequencial. Poderá ser usada a numeração romana se se preencher a caixa de seleção “Roman Numeral?”. Caso não se preencha o campo“Caption Prefix” será assumido o nome do ficheiro da imagem para o título da foto no site geocaching.com.
3.Depois de todas as fotos seleccionadas, carregar em “Upload All Images” no canto inferior direito, e aguardar comodamente pelo carregamento das imagens nos respectivos logs, podendo ser observado o seu estado nas colunas “Status” e “Progress”. Quando o processo termina é despoletada uma caixa com a mensagem "Upload Complete" para o écran.

Assim. Simples.
Apagar linhas de Logs
De modo a facilitar a visualização de registos, ou corrigir eventuais lapsos na introdução de carregamentos de fotografias, podem-se eliminar linhas, bastando para tal seleccionar a linha completa e pressionar a tecla "Delete", no computador.
Acrescentar linhas de Logs
Pode-se adicionar linhas de Logs usando a opção disponibilizada pelo botão “Add Log”. Para acrescentar uma linha é necessário saber o identificador único (logGuid –LUID) do Log no site geocaching.com, ou (mais simples) o endereço completo do Log.
Este “LUID” ou o endereço do Log é introduzido na caixa “Add Log” e fazendo “Confirm” o Log é acrescentado à lista, com a denominação “Manual”, e pode-se a partir daqui carregar fotos como anteriormente descrito.

TB Logger
A ferramenta TB Logger, Trackables Logger, permite efectuar de um modo automático vários tipos de Logs para vários TBs ou Geocoins em simultâneo.

Sabendo o código trackable de cada TB ou Geocoin, colocam-se os mesmos no campo “TB Codes”, sequencialmente e separados por ponto e vírgula.
Escreve-se um texto que será igual para todos os registos efectuados, na caixa “Log Text”.
Define-se a data para os Logs no campo “Select Date”.
Define-se o tipo de movimento pretendido, entre “Discover”, “Retrieve”, “Move to inventory” ou “Move to collection”.
Pressiona-se o botão “Process All” e aguarda-se pela mensagem "Finished processing" na caixa "Result".
[EN]
Geopt.org Geocaching Tools
GeoPT.org portal has created a tool with a simple and user friendly interface that allows you to do several automatized operations in the http://www.geocaching.com in a few minutes. This operations are related with bulk photo upload to your logs and automatic registration of trackables.
Instalation
Installation is quite easy and require a few indications by the user. It can be installed for one or all computer users.
The application requires the Microsoft .NET Framework 4.0, but if it's not present the App itself informs that and shows where to download it from.
First use - Authentication and Authorization
When you first use it it's necessary to authenticate it at geocaching.com, clicking at “Authenticate And Authorize”.
Although, even without authentication, it's possible to use the access to GeoPT.org online tools.
Authentication and authorization are done in three quick steps presented at the screen “Authentication”:
1. Click “Get Authorization”
2. Input you geocaching.com username and password
3. Click “Allow Access”
After these steps the app will grant access to the tools and you won't have to authenticate again. The app will look like this:
Using the tools
Online Tools
GeoPT.org online tools can be accessed through the available buttons. It's use is explained in GeopPT.org. At this moment the available tools are "Listing Generator" and "FTF Generator".
Tools
Photo Upload
Tool's main screen has several lines with the user last logs, witch are loaded when the tool is started or when you click “Refresh Logs List”. At this moment the tool allows you to access your last 100 logs.
Uploading Photos
For each log where you wish to add an image:
1. Click “Add Images” and you'll have a selection box to choose the photos you want to upload from your computer.
2. You can write the images title in the field “Caption Prefix”, and the photos will assume this name followed by a sequential numeral. You can use Roman numeral by choosing the option “Roman Numeral?”. In case you don't fill the field “Caption Prefix” the uploaded photo at geocaching.com will assume the file name.
3. After you have selected all the photos you wish to upload to all logs just click “Upload All Images” in the lower right corner and quietly wait while your photos are uploaded to the system. You can follow the upload progress watching the columns “Status” and “Progress”. When the upload is complete a "Upload Complete" message will be shown.
Simple as that.
Delete Logs from list
In a way to facilitate the log view, or correct eventual fails in the photo upload, it's possible to delete log lines. For that all you have to to is select the complete line and press "Delete" in your keyboard.
Add Logs to list
You can add logs to the list using the “Add Log” button. To add a log you need to know the log unique identifier (logGuid –LUID)at http://www.geocaching.com, or at least log's URL.
This “LUID” or, the URL is put in the “Add Log” text box and by clicking “Confirm” the log is add to the list with the denomination “Manual”. After that you can upload the photos you wish just like you to with all other logs.
TB Logger
The TB Logger tool (Trackables Logger) allows you to simultaneously perform several types of logs to different TravelBugs and Geocoins.
If you know the tracking code of each TB or geocoin, you put them altogether at the “TB Codes” box, one after the other and separated by semicolon.
Write your log, that will be the same for all the trackables in the “Log Text” box.
Insert the log date in the “Select Date” box.
Choose the log type from the available options: “Discover”, “Retrieve”, “Move to inventory” or “Move to collection”.
Click “Process All” button and wait for the final "Finished processing" message at the "Result" box.
Geopt.org Geocaching Tools
O portal GeoPT criou uma ferramenta com um interface simples e amigável que permite, em poucos minutos, e fectuar várias operações automatizadas sobre o site geocaching.com, especificamente na área do utilizador, tais como carregamento de imagens para os registos e registos automáticos de movimento de trackables.
Instalação
A instalação é simples e apenas requer algumas indicações por parte do utilizador. Pode ser instalada para um utilizador do computador ou para todos.
A aplicação tem como requisito o produto Microsoft .NET Framework 4.0, mas se o mesmo não se encontrar instalado no computador, a aplicação informa e indica o endereço para o descarregar.
Primeira utilização - Autenticação e Autorização
Na primeira utilização é necessário efectuar a autenticação junto do geocaching.com,carregando em “Authenticate And Authorize”.
No entanto, mesmo sem autenticação, é possível utilizar os acessos às ferramentas online do portal Geopt.org, “Online Tools”.
A autenticação e autorização são efectuadas seguindo os três passos apresentados no écran “Authentication”:
1. Carregar em “Get Authorization”
2. Introduzir os dados de utilizador no geocaching.com, nome utilizador e palavra-passe
3. Carregar em “Allow Access”
Após este processo a aplicação disponibilizará as ferramentas e em futuras utilizações não será necessário voltar a autenticar e autorizar, ficando a aplicação com o seguinte aspecto:
Utilização das ferramentas
Online Tools
As ferramentas online do portal Geopt.org são acedidas através dos botões disponíveis e a utilização de cada ferramenta está explicada nas respectivas páginas do portal.
Neste momento estão disponíveis as ferramentas "Listing Generator" e "FTF Generator".
Tools
Photo Upload
O écran principal da ferramenta de carregamento de fotografias é composto por várias linhas, correspondentes aos últimos Logs do utilizador, que são carregados quando o écran é iniciado, ou quando se escolhe o botão “Refresh Logs List”. De momento a ferramenta disponibiliza os últimos 100 Logs.
Carregamento de Imagens
Para cada Log onde se pretenda acrescentar imagens:
1. Carregar no botão “Add Images” e na caixa de selecção de imagens que aparecerá escolher uma ou várias fotografias de uma pasta localizada no computador.
2. Escrever o titulo para as imagens no campo “Caption Prefix”, pois as fotos a carregar em cada Log terão como título o texto definido neste campo seguido de um número sequencial. Poderá ser usada a numeração romana se se preencher a caixa de seleção “Roman Numeral?”. Caso não se preencha o campo“Caption Prefix” será assumido o nome do ficheiro da imagem para o título da foto no site geocaching.com.
3.Depois de todas as fotos seleccionadas, carregar em “Upload All Images” no canto inferior direito, e aguardar comodamente pelo carregamento das imagens nos respectivos logs, podendo ser observado o seu estado nas colunas “Status” e “Progress”. Quando o processo termina é despoletada uma caixa com a mensagem "Upload Complete" para o écran.
Assim. Simples.
Apagar linhas de Logs
De modo a facilitar a visualização de registos, ou corrigir eventuais lapsos na introdução de carregamentos de fotografias, podem-se eliminar linhas, bastando para tal seleccionar a linha completa e pressionar a tecla "Delete", no computador.
Acrescentar linhas de Logs
Pode-se adicionar linhas de Logs usando a opção disponibilizada pelo botão “Add Log”. Para acrescentar uma linha é necessário saber o identificador único (logGuid –LUID) do Log no site geocaching.com, ou (mais simples) o endereço completo do Log.
Este “LUID” ou o endereço do Log é introduzido na caixa “Add Log” e fazendo “Confirm” o Log é acrescentado à lista, com a denominação “Manual”, e pode-se a partir daqui carregar fotos como anteriormente descrito.
TB Logger
A ferramenta TB Logger, Trackables Logger, permite efectuar de um modo automático vários tipos de Logs para vários TBs ou Geocoins em simultâneo.
Sabendo o código trackable de cada TB ou Geocoin, colocam-se os mesmos no campo “TB Codes”, sequencialmente e separados por ponto e vírgula.
Escreve-se um texto que será igual para todos os registos efectuados, na caixa “Log Text”.
Define-se a data para os Logs no campo “Select Date”.
Define-se o tipo de movimento pretendido, entre “Discover”, “Retrieve”, “Move to inventory” ou “Move to collection”.
Pressiona-se o botão “Process All” e aguarda-se pela mensagem "Finished processing" na caixa "Result".
[EN]
Geopt.org Geocaching Tools
GeoPT.org portal has created a tool with a simple and user friendly interface that allows you to do several automatized operations in the http://www.geocaching.com in a few minutes. This operations are related with bulk photo upload to your logs and automatic registration of trackables.
Instalation
Installation is quite easy and require a few indications by the user. It can be installed for one or all computer users.
The application requires the Microsoft .NET Framework 4.0, but if it's not present the App itself informs that and shows where to download it from.
First use - Authentication and Authorization
When you first use it it's necessary to authenticate it at geocaching.com, clicking at “Authenticate And Authorize”.
Although, even without authentication, it's possible to use the access to GeoPT.org online tools.
Authentication and authorization are done in three quick steps presented at the screen “Authentication”:
1. Click “Get Authorization”
2. Input you geocaching.com username and password
3. Click “Allow Access”
After these steps the app will grant access to the tools and you won't have to authenticate again. The app will look like this:
Using the tools
Online Tools
GeoPT.org online tools can be accessed through the available buttons. It's use is explained in GeopPT.org. At this moment the available tools are "Listing Generator" and "FTF Generator".
Tools
Photo Upload
Tool's main screen has several lines with the user last logs, witch are loaded when the tool is started or when you click “Refresh Logs List”. At this moment the tool allows you to access your last 100 logs.
Uploading Photos
For each log where you wish to add an image:
1. Click “Add Images” and you'll have a selection box to choose the photos you want to upload from your computer.
2. You can write the images title in the field “Caption Prefix”, and the photos will assume this name followed by a sequential numeral. You can use Roman numeral by choosing the option “Roman Numeral?”. In case you don't fill the field “Caption Prefix” the uploaded photo at geocaching.com will assume the file name.
3. After you have selected all the photos you wish to upload to all logs just click “Upload All Images” in the lower right corner and quietly wait while your photos are uploaded to the system. You can follow the upload progress watching the columns “Status” and “Progress”. When the upload is complete a "Upload Complete" message will be shown.
Simple as that.
Delete Logs from list
In a way to facilitate the log view, or correct eventual fails in the photo upload, it's possible to delete log lines. For that all you have to to is select the complete line and press "Delete" in your keyboard.
Add Logs to list
You can add logs to the list using the “Add Log” button. To add a log you need to know the log unique identifier (logGuid –LUID)at http://www.geocaching.com, or at least log's URL.
This “LUID” or, the URL is put in the “Add Log” text box and by clicking “Confirm” the log is add to the list with the denomination “Manual”. After that you can upload the photos you wish just like you to with all other logs.
TB Logger
The TB Logger tool (Trackables Logger) allows you to simultaneously perform several types of logs to different TravelBugs and Geocoins.
If you know the tracking code of each TB or geocoin, you put them altogether at the “TB Codes” box, one after the other and separated by semicolon.
Write your log, that will be the same for all the trackables in the “Log Text” box.
Insert the log date in the “Select Date” box.
Choose the log type from the available options: “Discover”, “Retrieve”, “Move to inventory” or “Move to collection”.
Click “Process All” button and wait for the final "Finished processing" message at the "Result" box.